Even though most of the projects we work on in the meetings are heavily based on outside sources, I'm proud to say that I have constructed a new project I can call my very own. Scroll down to find out how to make this bag:
Materials
-1 XL t-shirt (also depends on how big you want your bag to be, but I must warn you that fitted t-shirts will require some adjustments)
-pins
-sewing machine (you can also hand sew, too)
-thread that matches your t-shirt color
-fabric scissors
-tailor's chalk
-ruler
-flat surface and lots of room
Instructions
1) Turn your shirt inside out, lay it on a flat surface, and gather pins and a pair of fabric scissors
2) Cut off the sleeves and around the collar (cut collar about 2 1/2 in. from sleeves and 1 1/2 in. below collar). Then, measure 6 in. from the bottom of the shirt. Using a straight-edge and tailor's chalk, draw a line and cut. Leave your scraps to the side; you will use them later.
Optional Step: Pin a few cm. lower than where you want to cut. This will keep the fabric from moving while you cut (it can be a pain to cut fabric when it keeps moving
3) You are going to sew up the sleeves next, but don't sew about 1/2 in. or 1 in. at the top of the sleeve. If you are using a sewing machine, pin about 1/2 in. away from the edge of the sleeve.
4) Next, fold the bottom of the shirt about 1 in. Sew over fold twice. I did a straight stitch first and then a zig-zap stitch for the second time around
5) Mark the bottom corners on both sides like this:
Sew a straight stitch along the line. Cut off the corners along the sewed line. This will give your bag a less square appearance
6) Turn the shirt inside out. It should look something like this:
6) Take the scraps that you set aside earlier. Take the piece you cut off from the bottom of the shirt (should look like a wide tube) and snip off were the sides have been sewn together. You should now have one long piece of fabric
7) Cut the fabric into three even strips of fabric.
8) Tie a knot leaving about 3 in. at the end for fringe. Braid the strips of fabric until you get to the last 4 in. of fabric. Tie a knot. I like to attach the knot between my toes when I braid.
9) Using the fabric from the sleeves you laid aside, cut off the hems. After that, snip the hems in half so you have a thin strip of fabric
10) Take your braid and string it through the hole you left at the top of the sleeve. Make sure the knot is on the outside of the bag. Do the same to the other side
11) Using the hem from your sleeve, wrap it around the top of the knot of your braid to your bag. Do this until you are sure it is pretty secure. Next, double knot the strand. (make sure you end up wrapping the fabric until you can double knot it facing the inside of your bag). Do the same to the other side of the bag
Voila! You're finished!
Here's how the bag looks like hung up
Another bag I made
A smaller version of the bag (I made it with a medium-sized t-shirt)
So next time you find yourself overwhelmed by a pile of unused t-shirts-fear no more! This project is a great way to recycle old clothes. You can use these bags for laundry, sleepovers, or even groceries (line your bag with a stronger fabric or an extra tee if you plan on placing heavy items in it).
Feel free to leave comments or e-mail me if you have any problems or questions! Also, I'd love to see your finished projects so be sure to send me a pic of your final product.
Friday, February 4, 2011
3rd and 4th Meeting
Sorry for not updating in a while, but I'll make up for it with details of our great past two meetings!
Third Meeting: T-Shirt Reconstruction
The third meeting at Starbucks was awesome! We all had a fun time restyling our old t-shirts and eating delicious cupcakes.
Here is a list of projects that we worked on during the 3rd Meeting:
a t-shirt bag (be sure to check out the tutorial)
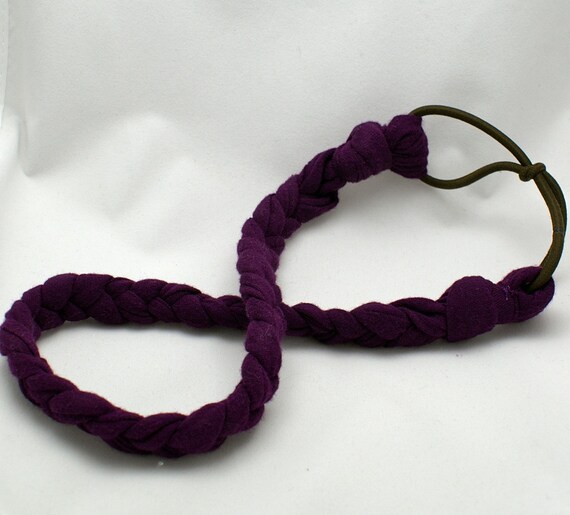
a cute braided headband with a flower applique
and finally, a very easy and versatile fringe scarf, courtesy of a free tutorial provided by psimadthis.com (check out her website and book for stylish and no-hassle tutorials).
Here are some videos of the step-by-step process of making the scarf and the rose applique (look for the flat rose tutorial) for the braided headband:
Fourth Meeting: Totoro Sock Animals
Next meeting, we were joined by three new members! Yay! The project we worked on was an adorably easy-to-make Totoro Sock Animal based on this tutorial.
We munched on some brownie-bites (thanks, Jinny) while sharing a few random stories. Some members even thought of great improvisations for their sock animal-some decided to make cats or bunnies!
Until next time!
Third Meeting: T-Shirt Reconstruction
The third meeting at Starbucks was awesome! We all had a fun time restyling our old t-shirts and eating delicious cupcakes.
Here is a list of projects that we worked on during the 3rd Meeting:
a t-shirt bag (be sure to check out the tutorial)
a cute braided headband with a flower applique
and finally, a very easy and versatile fringe scarf, courtesy of a free tutorial provided by psimadthis.com (check out her website and book for stylish and no-hassle tutorials).
Here are some videos of the step-by-step process of making the scarf and the rose applique (look for the flat rose tutorial) for the braided headband:
Fourth Meeting: Totoro Sock Animals
Next meeting, we were joined by three new members! Yay! The project we worked on was an adorably easy-to-make Totoro Sock Animal based on this tutorial.
We munched on some brownie-bites (thanks, Jinny) while sharing a few random stories. Some members even thought of great improvisations for their sock animal-some decided to make cats or bunnies!
Until next time!
Wednesday, January 26, 2011
Reminder for Members:
Our weekly meeting will take place on this Friday, not Thursday, and we will be meeting at Starbucks at the Village. It will probably end around 4:00. As you've read in the text I sent you, I will list the things you need to bring for tomorrow projects:
-1 L or XL t-shirt
-1 t-shirt of any size
-1 elastic hair band
-1 light weight, cotton-blend t-shirt
-and of course, your kits
Here's a preview to some things we will be making:
Can't wait to see you there!
-1 L or XL t-shirt
-1 t-shirt of any size
-1 elastic hair band
-1 light weight, cotton-blend t-shirt
-and of course, your kits
Here's a preview to some things we will be making:
Can't wait to see you there!
Saturday, January 22, 2011
2nd Meeting: Yo-Yo's
Second meeting was full of sewing, talking, laughing, Zingers (a chocolate snack cake), and music powered by Brianna's handy-dandy iPod speaker.
For this meeting, we learned how to sew yo-yo's and recieved materials for constructing a felt heart brooch.
Yo-yo's are an easy applique that looks kinda like a scrunched up circle. Not only are they super easy to make, they require nothing but some scrap fabric (you can try old clothes) and a needle and thread. Here's some pics since I highly doubt my blatant description did this adorable and versatile applique justice:
They are very easy to make and look great in different colors. Here's a great step-by-step tutorial.
The possibilites are endless! Just adding yo-yo's to anything will guarantee an awesomely updated look
Unfortunately, I lost track of time with the yo-yo's so the club couldn't get started with the heart brooches. Each member received the materials in order to make the brooches at the end of the meeting. I finished mine that very night-perhaps it was the guiltiness of not starting on it earlier. This is the outcome of my brooch:
The brooches were based on this tutorial. It's really easy and pretty self-explanatory. It may take a while to make, especially if you're a beginner sewer like me, but it's definitely worth it.
Below are some pictures of the meeting, courtesy of Ms. Mitchell with her iPhone and its cool camera effects
until next week :)
For this meeting, we learned how to sew yo-yo's and recieved materials for constructing a felt heart brooch.
Yo-yo's are an easy applique that looks kinda like a scrunched up circle. Not only are they super easy to make, they require nothing but some scrap fabric (you can try old clothes) and a needle and thread. Here's some pics since I highly doubt my blatant description did this adorable and versatile applique justice:
They are very easy to make and look great in different colors. Here's a great step-by-step tutorial.
The possibilites are endless! Just adding yo-yo's to anything will guarantee an awesomely updated look
Unfortunately, I lost track of time with the yo-yo's so the club couldn't get started with the heart brooches. Each member received the materials in order to make the brooches at the end of the meeting. I finished mine that very night-perhaps it was the guiltiness of not starting on it earlier. This is the outcome of my brooch:
The brooches were based on this tutorial. It's really easy and pretty self-explanatory. It may take a while to make, especially if you're a beginner sewer like me, but it's definitely worth it.
Below are some pictures of the meeting, courtesy of Ms. Mitchell with her iPhone and its cool camera effects
until next week :)
Wednesday, January 19, 2011
First Meeting!
Our first meeting ever took place last Thursday on the 13th (sorry about posting this a little late). Two members sadly couldn't make it, but nevertheless, we had a fun and successful time. Since it was just the first day, we decided to take it easy with the crafts. First, we made a couple of announcements on upcoming events and fundraisers (such as the Couple's Basket) and then we decorated our craft bags with fabric paint, felt, lace, and more. We shared a lot of great discussions and even had a little taste of Ms. Mitchell's (our supervisor/sponsor) personal music (hee hee).
Here's a few pics of the club in action (sorry for the sucky camera angles, I don't exactly have a steady hand)
The girls busy at work
Jinsil showin' off
Brianna showing her bf some love (the bag has their initials)
Ms. Mitchell and Ayah
Can't wait 'til next meeting!
Hannah
Here's a few pics of the club in action (sorry for the sucky camera angles, I don't exactly have a steady hand)
The girls busy at work
Jinsil showin' off
Brianna showing her bf some love (the bag has their initials)
Ms. Mitchell and Ayah
Can't wait 'til next meeting!
Hannah
Sunday, January 9, 2011
Sneak Peak: Couple's Basket Raffle
Attention all couples attending GPA!
I know it's a bit early to start thinking about gifts for Valentine's Day, but if you want to get your sweetie a great gift, it's better to prepare for an opportunity like this. Starting February, The Craftettes plan to sell raffle tickets. Buy these tickets for a chance to win the Couple's Basket (valued around $40!) Specific details will come later*
*details may change,but will be updated immediately
Here's a couple of pics of the things contained in the basket:
-two adorable plastic "glasses"
-a pair of hand-crocheted love birds (valued at $5 each)
-a pair of coordinating wrist warmers, also hand-crocheted (valued at $5 each)
-this is how the wrist-warmer looks while being worn
-a hand-crocheted sleep mask with a sequin accented strap, which is backed by a soft felt on the other side (valued at $15)
not pictured: a miniature bottle of apple cider, decorated recipe cards for Valentine's Day dinner ideas, and a large Valentine's Day card made and decorated by The Craftettes' fellow co-prez herself, Jinsil
Remember that you don't have to have a boyfriend or girlfriend if you want this basket. The basket can also impress your crush, too!
Love,
Hannah
I know it's a bit early to start thinking about gifts for Valentine's Day, but if you want to get your sweetie a great gift, it's better to prepare for an opportunity like this. Starting February, The Craftettes plan to sell raffle tickets. Buy these tickets for a chance to win the Couple's Basket (valued around $40!) Specific details will come later*
*details may change,but will be updated immediately
Here's a couple of pics of the things contained in the basket:
-two adorable plastic "glasses"
-a pair of hand-crocheted love birds (valued at $5 each)
-a pair of coordinating wrist warmers, also hand-crocheted (valued at $5 each)
-this is how the wrist-warmer looks while being worn
-a hand-crocheted sleep mask with a sequin accented strap, which is backed by a soft felt on the other side (valued at $15)
not pictured: a miniature bottle of apple cider, decorated recipe cards for Valentine's Day dinner ideas, and a large Valentine's Day card made and decorated by The Craftettes' fellow co-prez herself, Jinsil
Remember that you don't have to have a boyfriend or girlfriend if you want this basket. The basket can also impress your crush, too!
Love,
Hannah
Subscribe to:
Posts (Atom)